Since Gina got her ears pierced last year her earring collection has been growing. She informed me that she needed some place to keep them all. We looked all over for a cute affordable earring tree and found nothing we liked. I thought there has to be a way to make one. This project is super affordable and in my opinion super cute. I had all of the supplies on hand, but even if you need to purchase them you will spend less than $3!!!

Supplies needed: An unfinished wood 4x6 frame from Michaels ( $1 )
Plastic Canvas (mine was from the flea market, $1 for 20 sheets)
Craft Paint (on hand)
Embellishments (I just used a ribbon, but the sky is the limit)
Glue (on hand)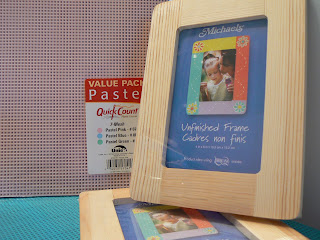 Set up your work space.
 Open the frame and remove the cardboard frame backer (for lack of a better word). Set this aside, we will use it as a template later.
 Paint the wooden frame any color your heart desires. I used two coats making sure to get the outer edges and the inner edges.
 While the paint is drying take the cardboard backer from the frame and trace it onto the plastic canvas.

 Next take you scissors and cut your canvas just inside the line you traced. It will need to be just slightly smaller than the piece you traced.
 Make sure your frame is dry and flip it over. Place your piece of plastic canvas in the frame.
 Then fold down the metal holders to keep the plastic in place.
 There was a peg that came with the frame. Place this peg into one of the holes in the back of the frame. Depending on which hole you put it in your earring tree will be either vertical or horizontal.
 Finally stand your frame upright and embellish. I just used hot glue to attach a bow on mine. I figured simple was best, let the earrings shine!
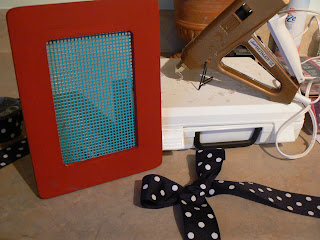 Place your earrings in the holes and PRESTO! A super earring holder on the cheap :)
 Please let me know what you think? Too many photos? Too much instruction? This was my first one, so I am open to any feedback. Thanks! Oh and if you make one leave a link I would love to see it :)
 Set up your work space. Open the frame and remove the cardboard frame backer (for lack of a better word). Set this aside, we will use it as a template later.
 Paint the wooden frame any color your heart desires. I used two coats making sure to get the outer edges and the inner edges.
 While the paint is drying take the cardboard backer from the frame and trace it onto the plastic canvas.
 Next take you scissors and cut your canvas just inside the line you traced. It will need to be just slightly smaller than the piece you traced.
 Make sure your frame is dry and flip it over. Place your piece of plastic canvas in the frame.
 Then fold down the metal holders to keep the plastic in place.
 There was a peg that came with the frame. Place this peg into one of the holes in the back of the frame. Depending on which hole you put it in your earring tree will be either vertical or horizontal.Finally stand your frame upright and embellish. I just used hot glue to attach a bow on mine. I figured simple was best, let the earrings shine!
 Place your earrings in the holes and PRESTO! A super earring holder on the cheap :)
 Please let me know what you think? Too many photos? Too much instruction? This was my first one, so I am open to any feedback. Thanks! Oh and if you make one leave a link I would love to see it :)
9 comments:
Super cute idea!! Something I could totally do with my girls. Thanks for the great tutorial.
So glad you are a quilting maniac like me. :)
I think you did a great job on your tutorial! I want to make one!
Great job with the tutorial! I've seen these with wire mesh, but not with the plastic canvas (which seems a whole lot easier to get and work with!). Great idea!
Super cute, great job! And it is my two new favorite colors!
What a great project, and a great tutorial!! Thank you so much for the sweet comments you left on my blog. During these tough times, my little ones, blogging friends, and crafting really gets me through. I will pray your husband finds work too. Keep on crafting and enjoying your family. Love, Ashley
Nice brief and this enter helped me alot in my college assignement. Gratefulness you for your information.
Easily I to but I think the brief should acquire more info then it has.
Nice dispatch and this mail helped me alot in my college assignement. Thank you for your information.
I think you did a wonderful job and I can't wait to do this with my daughter. She will be super excited and will want to everyone one ;*)
Post a Comment