Wow I can't believe this is my first tutorial!
Since Gina got her ears pierced last year her earring collection has been growing. She informed me that she needed some place to keep them all. We looked all over for a cute affordable earring tree and found nothing we liked. I thought there has to be a way to make one. This project is super affordable and in my opinion super cute. I had all of the supplies on hand, but even if you need to purchase them you will spend less than $3!!!

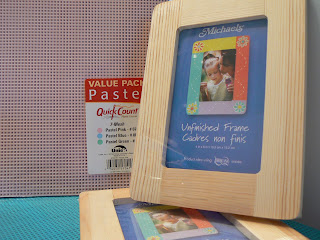
Supplies needed: An unfinished wood 4x6 frame from Michaels ( $1 )
Plastic Canvas (mine was from the flea market, $1 for 20 sheets)
Craft Paint (on hand)
Embellishments (I just used a ribbon, but the sky is the limit)
Glue (on hand)
Set up your work space.

Open the frame and remove the cardboard frame backer (for lack of a better word). Set this aside, we will use it as a template later.

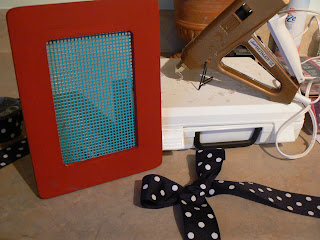
Paint the wooden frame any color your heart desires. I used two coats making sure to get the outer edges and the inner edges.

While the paint is drying take the cardboard backer from the frame and trace it onto the plastic canvas.


Next take you scissors and cut your canvas just inside the line you traced. It will need to be just slightly smaller than the piece you traced.

Make sure your frame is dry and flip it over. Place your piece of plastic canvas in the frame.

Then fold down the metal holders to keep the plastic in place.

There was a peg that came with the frame. Place this peg into one of the holes in the back of the frame. Depending on which hole you put it in your earring tree will be either vertical or horizontal.

Finally stand your frame upright and embellish. I just used hot glue to attach a bow on mine. I figured simple was best, let the earrings shine!
Place your earrings in the holes and PRESTO! A super earring holder on the cheap :)

Please let me know what you think? Too many photos? Too much instruction? This was my first one, so I am open to any feedback. Thanks! Oh and if you make one leave a link I would love to see it :)
 My nephew, Baylor, is turning 7 this week. He has such a great imagination! Last year I made him this great Tattoo Shop. I was wondering what in the world might come close to that. I had purchased some vintage Star Wars sheets at the thrift last summer. Bay loves Star Wars and has been asking his mom what I was going to do with them ever since he saw them at my house.
 Well since I had made his brother an I spy quilt I thought it might be perfect to make Baylor a quilt of his own. These boys are snugglers. I finally came up with a plan for the fabric while in the shower last week. I started the quilt this afternoon and have 5 days before I need to gift it. Needless to say I will be one crazy quilting machine LOL!
 I have to add some more to the sides. I am thinking wonky stars of various sizes? Any thoughts?

 I participated in a great
  I was so thankful that Wendy developed a
  Sorry for the terrible photo.


 Lots of Sledding,
 and Gina Crafting!
 Adler wanted no part of it!!!


